I love when a recipe turns out absolutely amazing, especially when liberties are taken!
I finished canning and had a few peaches that too bruised to be used. Back in July, I received an update from "Food and Whine" about using peaches in muffins. Totally alien territory for me, using anything but berries in my muffin making, but I figured I'd take a risk and try this.
Boy am I glad I did! These muffins were so moist, with the peaches and yogurt, but not as sugary as I feared; it took a serious force of will not to devour the whole batch.
While the original recipe called for slivered almonds in the topping, I had pecans in my cupboard so I subbed those in; didn't miss the almonds at all!
These will make a great warm breakfast in the future; they were incredibly filling, yet light enough for the early hours, and have no need for butter at all ;)
Warm Peach Muffins
ingredients
2 2/3 cup all purpose flour
1 tsp baking soda
pinch of salt
1 cup brown sugar
1 cup plain yogurt
1/2 cup vegetable oil
2 eggs
1 tsp vanilla
1 cup peaches, mashed
topping:
1/2 cup brown sugar
1/2 cup chopped pecans
1/2 tsp cinnamon
4 tsp vegetable oil
In a large bowl, whisk together flour, baking soda, and salt. In another bowl combine brown sugar, yogurt, oil, eggs, and vanilla, and whisk until smooth. Add to flour mixture, top with mashed peaches, and mix until just combined.
combine topping ingredients and stir until sugar begins to cling.
Pour batter into muffin cups or greased muffin tin, sprinkle with topping, and bake for 25 minutes at 350 degrees.
My batch made about 14 muffins using a small muffin tin.
Wednesday, August 5, 2009
Tuesday, August 4, 2009
The Nightmare Before Canning
Last winter, I hit a close-out sale and picked up a canning kit that included a jar lifter and funnel, and thought to my self I am going to can this summer. My mum and I had canned peaches and apricots and made jam almost every summer, and since moving away for University, I haven't had the chance to keep up this summer ritual.
This year, with my own kitchen, I finally had the chance. Wouldn't you know that everybody else seems to have had the same idea as me. Five stores later and I finally found some mason jars bigger than a half pint (that's only 250 ml), and scurried home, only to find that both the jar lifter and my biggest pot were too small.
Today I again chased all over town trying to find a pot big enough to hold my quart jars; I made two trips out and ended up with two pots, the first of which only fits pint jars. ARGH! I'd have taken the jars back, but I thought I'd be smart and wash them in advance, ergo I was stuck trying to find a stock pot tall and wide enough to fit my larger jar lifter and cover the tops of the jars.
All the hunting almost made the whole idea not worth trying. Note to all you first time canners, find out which Canadian Tire has both a canning pot and all the tools in stock before you go, AND make sure you buy the jars that will fit the pot at the same time!!!
At least I'm fully equipped for next year!
Nevertheless, the nightmare ended when I finally got started blanching and processing the beans. The tiny ping of lids popping as the jars cooled made me dance a little victory dance; at least the frustration of the last two days had resulted in success at this most important point!
2 lbs. green beans, trimmed and washed.
1 cup vinegar
2 tbsp pickling salt
2 tsp (or a small bunch) dill weed
2 cloves garlic
3 cups water
2 tsp cayenne
Blanch the beans in boiling, salted water for about three minutes, or until bright green. Drain and douse beans in icy water to stop cooking. Pack length-wise into clean, sterilized jars, up to the shoulder (that's just below the mouth), leaving about 1/2 inch at the top.
Combine the other ingredients and bring to a boil. Cover the beans, leaving 1/2 inch headspace. Put on processed lids and hand tighten rings.
Process in using water bath method for 10 minutes.
(Water Bath: submerge jars in boiling water, with at least one inch of water above lids for specified time.)
Beautiful! Its peaches and apricots tomorrow! I may even try to do a batch of tomato sauce!
Wednesday, July 29, 2009
A Cheesy Affair
I. Love. Cheese. Especially if it is of the firm, white, aged variety. enter Parmesan and Asiago stage left.
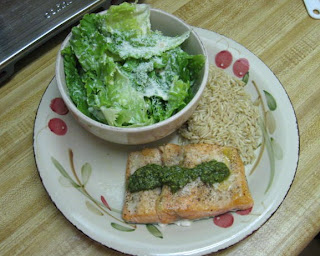
Todays dinner comes from the pages of "A Consuming Passion," a lovely food blog I raided the other day (find it at http://www.aconsumingpassion.com/). Instead of salmon, I had some rainbow trout that I got on sale, and this fish made the cut! The the original recipe called for two fillets of salmon, 1/4 cup of fine grated Parmesan, salt and pepper, and basil pesto, and I didn't mess with it beyond shirnkage (and the fish ;) ) and it was delish!
you can either use skin-on or skinned fillets, although I would watch the fillet carefully if you go skinless, as you could overcook it after the fish is turned.
Anyway, the fish took less than a minute to prep; season the fish with salt and pepper, then pat the cheese on one side firmly so it is coated.
you then saute the fish in a bit of veg or olive oil in a non-stick pan. Heat the oil on high in a non-stick or well seasoned iron skillet, then place the fillets cheese-side down and reduce the temp to medium. Cook for about four minutes, or until most of the flesh you can see from the side is opaque. Flip the fillet over and cook the rest of the way, about 3-4 mins, depending on the thickness.
You can either leave it alone after that, or drizzle it with some basil pesto.
I would stay away from pre-shredded cheese in a can, as it can be way too salty, although if that's what you got... I might also cut the salt seasoning on the fish as the pesto I had seemed to do the job admirably.
I paired this dish with 1/4 cup of brown rice cooked in chicken broth and a basic Caesar salad with Parmesan.
I can't wait to try it with salmon!
Easiest Smoothie Ever!
I've had a small tub of raspberry sorbetto in my freezer for ever. As much as I love both raspberries and frozen desserts, this treat was so intense in flavour that i would scoop out a spoonful or two before putting it back. Like eating pure raspberry puree.
Once again, the heatwave here in BC has led me to try something new... a Raspberry Lime Smoothie!
I didn't measure anything for this; better to go for texture and taste!
I used up the last of the sorbetto, a bit of limeade, and a pair of ice cubes in the blender on low and voila!
so much faster than using berries, bananas and yogurt!
...drat. need more sorbetto!
Tuesday, July 28, 2009
Relish those garden greens
As much as I bellyache about my basement apartment's lacks (no dishwasher, no washer/dryer blah blah blah...) I have been relishing the cool ambient temp since this heat wave started. I hit Pepper's Foods today for some fresh veg and felt like I was walking through a sauna! Definitely not in the mood to actually cook something for lunch today, ergo salad!
I rarely follow salad recipes; all mine include some combination of tomatoes, cucumbers, mushrooms, and cheese. Sometimes with lettuce, sometimes pasta. Said combos are usually smothered in Three Cheese Ranch or Italian salad dressing.
For some odd reason, I had an avocado craving today, so I resolved to buy my first ever.
If you have never had avocado before: a ripe avocado is a dark green and gives slightly when squeezed. If the one you bought is bright green or hard, you can place it in a paper bag to speed up the ripening process. If the skin is black and the flesh is gives a lot, it is over ripe; make guacamole instead!
Italian dressing didn't seem right for this salad, so i stuck to the basics of olive oil, vinegar, and salt and pepper drizzled over the top. The salad was bright, light, and filling, and the flavours of the veggies shone through on their own strength, instead of drowning in dressing.
Great Greens Summer Salad
4 leaves Green Leaf lettuce
1 Roma tomato, diced
1/4 head of broccoli, cut into florets
1/2 medium avocado, peeled and diced
1/3 medium cucumber, diced
Drizzle with olive oil, lime juice, white vinegar, and a dash of salt and pepper
More than Tuna Salad Sandwiches
I want to apologize in advance for this and the previous posts' lack of pictures! The idea to start the blog came after I had finished dinner last night. when I make these again, I'll add pictures for you!
Anyway, on to the next recipe.
I have had a small can of tuna in my cupboard for months, and as much as I love tuna, it has yet to feature in a summertime meal. Instead I usually make tuna salad melts to go with fall or winter soups, and otherwise ignore the fish all together.
This recipe for Rigatoni alla Calabria from "Healthy Cooking For Two" saved me from eying the best before date before turfing out unused food. Even better, it took all of fifteen minutes to prep and cook!
The single serving calls for 3 1/2 ounces, or just over 1/3 cup of tuna fluffed, so the regular sized cans of tuna will be too much. you can find 85 gram cans in your local grocery, next to the ones with flavors, (think lemon pepper).
It is also great for rescuing that last little bit of green veg in the bottom of your crisper drawer from the bin. I followed the directions and used broccoli, but cauliflower, beans or peas would make a great sub!
I also found that this recipe came out a bit dry for my taste, as there was no sauce, so i drizzled a bit of Italian salad dressing over the top.
Rigatoni alla Calabria for One
Ingredients
1 cup Rigatoni, cooked without salt (follow package directions)
1 1/2 tsp olive oil
2/3 cup broccoli florets
1 clove garlic, crushed (or about 1/2 tsp minced)
1 medium tomato, diced
1 85 g tin water-packed canned solid tuna
pepper to taste
2 tablespoons Parmesan cheese if desired
Directions
cook the pasta according to package directions, without salt
While the pasta cooks, heat the olive oil in a medium non-stick or iron skillet over medium-high heat. Add the broccoli and cook for about three minutes, until bright green but still firm. Add the garlic and cook until just fragrant, then add the tomatoes.
Drain the tuna, fluff it with a fork, and add to the skillet, then reduce the heat to low. Cover (tinfoil works if your pan has no lid) and cook slowly for about 5 minutes.
when the pasta is done, drain and put into your dish of choice, and top with the tuna mixture. sprinkle with Parmesan and pepper. If you find the dish too dry, try drizzling with a little olive oil or Italian salad dressing.
Monday, July 27, 2009
Breakfast with Bran
Read On! Don't fear the 'B' word! I swear this breakfast is totally worth hitting the bulk store for a cup of wheat bran. These pecan brancakes turned out light and fluffy and oh so good! I made these on Friday, and froze most of them (they perk up great in the toaster oven) so i have breakky for a few days!
On a less enthusiastic note, the recipe i used claimed to make 12 brancakes, but even following the 1/3 cup measure direction i only ended up with 9. never the less, this recipe will be repeated many times over!
I adapted this recipe found in "Healthy Cooking For Two (Or Just For You)" by Frances Price a little, more from economy than taste. instead of the low-fat plain yogurt, i used a regular french vanilla, which complemented the cinnamon and honey without being too sweet
Pecan Brancakes
Ingredients for 6 Brancakes
1/3 cup All-purpose flour, unsifted
1/2 tsp Baking Soda
1/4 tsp Ground Cinnamon
1/2 cup Wheat bran, fine or coarse
1 large Eggs
3/4 cup Low-fat plain or french vanilla yogurt
1 tbsp Molasses or honey
2 tbsp Chopped pecans
1 tsp Canola oil
Directions
Sift the flour, baking soda, and cinnamon into a medium mixing bowl. Stir in the bran.
In another medium mixing bowl, beat the eggs until foamy, then beat in the yogurt and molasses or honey.
Pour into the flour mixture and stir just enough to moisten. Add the pecans; do not over mix.
Place a heavy 10" nonstick or iron skillet over medium heat for 3-5 minutes, then brush the skillet lightly with 1/2 teaspoon of the oil. With a 1/3 cup measure, scoop the batter into the skillet to form thick brancakes about 3" across. Cook the brankcakes for 3 to 4 minutes, or until they are browned on teh bottom. Flip them and cook them for 2 to 3 minutes, or until both sides are brown. Remove the first batch of brancakes from the skillet.
Repeat until you've used all the oil and batter.
As for toppings, i tried a few, including tahini and honey (if you don't have tahini, which is a butter-like paste made from seasme seeds, you could use peanut or almond butter), apricot jam, and pancake syrup. Fresh berries or a cider syrup would also go great!
Cider Syrup
1 cup (or 2 for 12 brancakes) of apple juice or cider
in an small sauce pan, bring the juice to a boil over high heat. maintain boil until liquid is reduced by half, then remove from the heat
Wilcommen! Bienvenue! Welcome!
Wilcommen! Bienvennue! Welcome!
I have spent the last week "blog hopping" looking for recipes designed for only one or two diners, and have found very little indeed. That is not to say the myriad of blogs out there were not assiduously mined of their comestible goodness. Rather i am faced with the daunting task of trying to downsize these delectable delights into something that wont leave me with a week's worth of leftovers crowding my mini fridge. You can only eat spaghetti so many times, no matter how good Nona's red sauce recipe is!
I could just suck it up and do the math to cut down regular sized recipes, but this usually results in something that just doesn't live up to the promise made by the list of ingredients. I am also frequently stymied by the need for a full sized oven or more than two elements. Sadly, my apartment was only equipped with two feet of free counter space after the toaster oven and hotplate took up residence, so it necessitates some creativity to tackle more than grilled cheese or pizza.
To come to the point.
Cooking for just yourself in a tiny kitchenette can be utterly defeating, especially when you have takeout menus pasted to the door! Never fear! Here you may find a variety of recipes that have been downsized, tested and even tweaked to make cooking small a big hit!
Subscribe to:
Posts (Atom)